
本記事ではゲートウェイ冗長化技術である「VRRP」障害時の挙動・確認方法をご紹介させて頂きます。
>>参考記事: 「CCIEが語る!ネットワークエンジニアにオススメな本・参考書!」
>>参考記事: 「[まとめ] Juniper/Junosの検証結果を記事にまとめました!」
【VRRP 障害検証】検証内容

まず最初に検証内容の以下にまとめました。
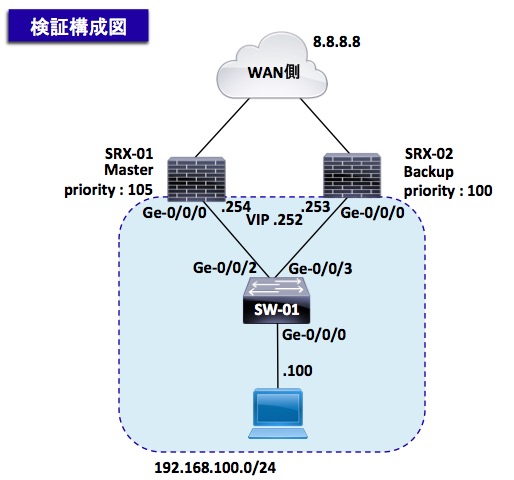
ネットワーク図
検証時のネットワーク環境は以下の通りです。
検証要件
以下の要件に基づきVRRP障害時の挙動を確認します。
- SRX-01(Masterルータ)のGe-0/0/0のケーブルを抜線する
- SRX-02(Backupルータ)がMasterへ昇格すること
【VRRP 障害検証】事前確認 ※飛ばしてOKです。
検証環境の事前設定値を以下に纏めております。
スキップしたい人は「4章:設定変更作業から」をクリックして下さい。
[br num=”1″]
※本検証前に予めVRRPの設定は実施済みです。
VRRPの設定に関する検証内容を確認したい人は、以下の記事をご確認下さい。
>>参考記事: 「SRX VRRP設定方法(vrrp-group, accept-data)を紹介」
では、検証前時点の各機器の設定内容やログは以下の通りです。
SRX-01 事前ログ
・「show configuration | display set | match」コマンドで設定情報を出力しております。
※以下の通り、VRRPの設定は実施済みです。
root@SRX-01> show configuration | display set | match ge-0/0/0
set security zones security-zone trust interfaces ge-0/0/0.0
set interfaces ge-0/0/0 unit 0 family inet address 192.168.100.254/24 vrrp-group 1 virtual-address 192.168.100.252
set interfaces ge-0/0/0 unit 0 family inet address 192.168.100.254/24 vrrp-group 1 priority 120
set interfaces ge-0/0/0 unit 0 family inet address 192.168.100.254/24 vrrp-group 1 accept-data
SRX-02 事前ログ
・「show configuration | display set | match」コマンドで各設定情報を出力しております。
※以下の通り、VRRPの設定は実施済みです。
root@SRX-02> show configuration | display set | match ge-0/0/0
set security zones security-zone trust interfaces ge-0/0/0.0
set interfaces ge-0/0/0 unit 0 family inet address 192.168.100.253/24 vrrp-group 1 virtual-address 192.168.100.252
set interfaces ge-0/0/0 unit 0 family inet address 192.168.100.253/24 vrrp-group 1 priority 110
set interfaces ge-0/0/0 unit 0 family inet address 192.168.100.253/24 vrrp-group 1 accept-data
[br num=”1″]
では、早速ですがVRRPの障害試験を実施してみましょう!
【VRRP 障害検証】障害試験

まずは障害試験前のVRRPのステータスを確認してみましょう!
障害試験前 VRRPステータス確認
以下の通り、SRX-01がMasterルーターになっている事を確認します。
root@SRX-01> show vrrp
Interface     State       Group   VR state VR Mode   Timer    Type   Address
ge-0/0/0.0    up              1   master   Active      A  0.675 lcl    192.168.100.254
[br num=”1″]
また、SRX-02がBackupルータになっている事を確認します。
root@SRX-02> show vrrp
Interface     State       Group   VR state VR Mode   Timer    Type   Address
ge-0/0/0.0    up              1   backup   Active      D  3.460 lcl    192.168.100.253
                                                                vip    192.168.100.252
[br num=”1″]
VRRPのVIP宛へ通信が通ることを確認します。
MacBook-Air:~ testuser$ ping 192.168.100.252
PING 192.168.100.252 (192.168.100.252): 56 data bytes
64 bytes from 192.168.100.252: icmp_seq=0 ttl=64 time=0.629 ms
64 bytes from 192.168.100.252: icmp_seq=1 ttl=64 time=0.828 ms
64 bytes from 192.168.100.252: icmp_seq=2 ttl=64 time=0.931 ms
64 bytes from 192.168.100.252: icmp_seq=3 ttl=64 time=0.898 ms
64 bytes from 192.168.100.252: icmp_seq=4 ttl=64 time=0.883 ms
では、上記の通りVRRPの設定が正常に完了しておりますが、実際に障害を発生させたいと思います。
障害試験 SRX-01 Ge-0/0/0 Down
まずはSRX-01のGe-0/0/0に接続されているケーブルを抜線してみます。
[br num=”1″]
以下の通り、SRX-01のGe-0/0/0がDownした事を確認しましょう!
root@SRX-01> show interfaces terse | match ge-0/0/0
ge-0/0/0                up    down
ge-0/0/0.0              up    down   inet     192.168.100.254/24
また、SRX-01のステータスがMasterからinitへ移行した事を確認します。
root@SRX-01> show vrrp
Interface     State       Group   VR state VR Mode   Timer    Type   Address
ge-0/0/0.0    down            1   init     Active      N  0.202 lcl    192.168.100.254
                                                                vip    192.168.100.252
SRX-01のLANリンクのDownにより、SRX-02がMasterへ昇格した事を確認しましょう!
root@SRX-02> show vrrp
Interface     State       Group   VR state VR Mode   Timer    Type   Address
ge-0/0/0.0    up              1   master   Active      A  0.202 lcl    192.168.100.253
                                                                vip    192.168.100.252

root@SRX-02> show log messages | match vrrp
Mar 29 08:04:31  SRX-02 vrrpd[1999]: VRRPD_NEW_MASTER: Interface ge-0/0/0.0 (local address 192.168.100.253) became VRRP master for group 1 with master reason masterNoResponse

root@SRX-02> show vrrp detail
Physical interface: ge-0/0/0, Unit: 0, Address: 192.168.100.253/24
  Index: 74, SNMP ifIndex: 518, VRRP-Traps: disabled, VRRP-Version: 2
  Interface state: up, Group: 1, State: master, VRRP Mode: Active
  Priority: 110, Advertisement interval: 1, Authentication type: none
  Advertisement threshold: 3, Computed send rate: 0
  Preempt: yes, Accept-data mode: yes, VIP count: 1, VIP: 192.168.100.252
  Advertisement Timer: 0.265s, Master router: 192.168.100.253
  Virtual router uptime: 00:50:05, Master router uptime: 00:02:59
  Virtual Mac: 00:00:5e:00:01:01
  Preferred: yes
  Tracking: disabled
上記の通り、無事SRX-02がMasterへ昇格したことが分かりますね!
障害試験 PCからのPing検証
では、上記障害試験のPing結果を紹介します。
[br num=”1″]
以下の通り、数回通信が不通になった後、無事Pingが復旧していることを確認しましょう!
MacBook-Air:~ testuser$ ping 8.8.8.8
PING 8.8.8.8 (8.8.8.8): 56 data bytes
64 bytes from 8.8.8.8: icmp_seq=0 ttl=64 time=6.672 ms
64 bytes from 8.8.8.8: icmp_seq=1 ttl=64 time=10.111 ms
64 bytes from 8.8.8.8: icmp_seq=2 ttl=64 time=5.003 ms
64 bytes from 8.8.8.8: icmp_seq=3 ttl=64 time=9.267 ms
64 bytes from 8.8.8.8: icmp_seq=4 ttl=64 time=4.231 ms
64 bytes from 8.8.8.8: icmp_seq=5 ttl=64 time=7.156 ms
Request timeout for icmp_seq 6
Request timeout for icmp_seq 7
Request timeout for icmp_seq 8
64 bytes from 8.8.8.8: icmp_seq=9 ttl=64 time=4.468 ms
64 bytes from 8.8.8.8: icmp_seq=10 ttl=64 time=4.666 ms
64 bytes from 8.8.8.8: icmp_seq=11 ttl=64 time=5.068 ms
64 bytes from 8.8.8.8: icmp_seq=12 ttl=64 time=6.797 ms
Junosの勉強方法

では最後にJunosの勉強方法について紹介いたします。
[br num=”1″]
Juniper機器は通信プロバイダーなどのミッションクリティカルが環境で多く導入されております。
[br num=”1″]
その為、Junosを勉強すると、大規模なネットワークへ関わるチャンスが増えます!
Junosの勉強は以下の参考書で勉強を進めましょう!!
[br num=”1″]
以下のアマゾンリンクから内容の詳細(価格/評価等)が確認出来ますので、ぜひ確認してみて下さいね!


まとめ

最後までお読み頂きましてありがとうございます。
[br num=”1″]
Juniperに関する記事は以下にまとめております。
ご興味のある方は是非ご覧ください。
>>参考記事: 「[まとめ] Juniper/Junosの検証結果を記事にまとめました!」
>>参考記事: 「業務で役立つshow、clear、requestコマンドを紹介!」