
本記事ではSRXのセキュリティポリシー設定及び正常性確認の検証結果をご紹介させて頂きます。
- ▼ オススメの記事 ▼
【ポリシー 検証】検証内容

まず最初に検証内容の以下にまとめました。
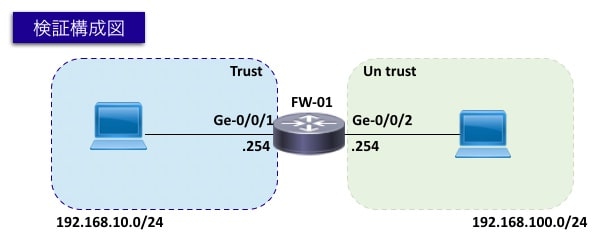
ネットワーク図
検証時のネットワーク環境は以下の通りです。
設定要件
以下の要件に基づきポリシーの設定を実施します。
- TrustゾーンからUntrustゾーン(192.168.100.1)へのPing通信を許可する
- Untrustゾーンからの通信はSRX向けのPing通信以外は許可しない
【ポリシー 検証】設定作業

それでは、ポリシーの設定を進めてみましょう!
ポリシーの設定は以下の順序で設定することが可能です。
- ポリシーの設定方法
- セキュリティゾーンの設定
- Address-bookの設定
- ポリシーの設定
手順1 : セキュリティゾーンの設定
セキュリティゾーンの設定は「set security zones security-zoneコマンド」にて設定可能です。
今回はge-0/0/1をtrustゾーン、ge-0/0/2はuntrustゾーン(srxへのpingは許可)として設定します。
// trust側の設定
set security zones security-zone trust host-inbound-traffic system-services all
set security zones security-zone trust host-inbound-traffic protocols all
set security zones security-zone trust interfaces ge-0/0/1
// untrust側の設定
set security zones security-zone untrust interfaces ge-0/0/2
set security zones security-zone untrust interfaces host-inbound-traffic system-services ping
手順2 : Address-bookの設定
Address-bookの設定は「set security address-bookコマンド」にて設定可能です。
今回は2つのAddress-bookを作成します。
・ TrustNetwork : 192.168.10.0/24
・ UnrustNetwork : 192.168.100.1/32
// trust側のアドレスを指定
set security address-book global address TrustNetwork 192.168.10.0/24
// 通信を許可するuntrust側のアドレス(192.168.100.1/32)を指定
set security address-book global address UnrustNetwork 192.168.100.1/32
手順3 : ポリシーの設定
ポリシーの設定は「set security policiesコマンド」にて設定可能です。
今回はTrustゾーンからUntrustゾーン(192.168.100.1)へのPing通信を許可する設定を実施します。
// Trustゾーン(192.168.10.0/24)からUntrustゾーン(192.168.100.1)へのPing通信
set security policies from-zone trust to-zone untrust policy PING match source-address TrustNetwork
set security policies from-zone trust to-zone untrust policy PING match destination-address UnrustNetwork
set security policies from-zone trust to-zone untrust policy PING match application junos-icmp-all
set security policies from-zone trust to-zone untrust policy PING then permit
// Trustゾーン→Untrustゾーンへのdeny設定(暗黙のdenyが有効なので不要だが、カウンターを確認したい為設定)
set security policies from-zone trust to-zone untrust policy ALL_DROP match source-address any
set security policies from-zone trust to-zone untrust policy ALL_DROP match destination-address any
set security policies from-zone trust to-zone untrust policy ALL_DROP match application any
set security policies from-zone trust to-zone untrust policy ALL_DROP then deny
// Untrustゾーン→Trustゾーンへのdeny設定(暗黙のdenyが有効なので不要だが、カウンターを確認したい為設定)
set security policies from-zone untrust to-zone trust policy ALL_DROP match source-address any
set security policies from-zone untrust to-zone trust policy ALL_DROP match destination-address any
set security policies from-zone untrust to-zone trust policy ALL_DROP match application any
set security policies from-zone untrust to-zone trust policy ALL_DROP then deny
【ポリシー 検証】正常性確認

では、正常性確認してみましょう!
セキュリティゾーン 正常性確認
まずは「show security zones」コマンドでゾーン設定を確認してみましょう!
show security zones の確認結果
実際のログは以下の通りです。
ge-0/0/1がtrustゾーン、ge-0/0/2がuntrustゾーンとして設定されている事を確認しましょう。
test> show security zones
Security zone: trust
Send reset for non-SYN session TCP packets: Off
Policy configurable: Yes
Interfaces bound: 1
Interfaces:
ge-0/0/1.0
Security zone: untrust
Send reset for non-SYN session TCP packets: Off
Policy configurable: Yes
Screen: untrust-screen
Interfaces bound: 2
Interfaces:
dl0.0
ge-0/0/2.0
Security zone: junos-host
Send reset for non-SYN session TCP packets: Off
Policy configurable: Yes
Interfaces bound: 0
Interfaces:
ポリシー 正常性確認
次に「show security policies」コマンドでポリシー設定を確認してみましょう!
show security policies の確認結果
実際のログは以下の通りです。
今回作成した新規ポリシー(PING,ALL_DROP)が作成されている事を確認しましょう。
test> show security policies
Default policy: deny-all
Pre ID default policy: permit-all
From zone: trust, To zone: trust
Policy: trust-to-trust, State: enabled, Index: 4, Scope Policy: 0, Sequence number: 1
Source vrf group: any
Destination vrf group: any
Source addresses: any
Destination addresses: any
Applications: any
Action: permit
From zone: trust, To zone: untrust
Policy: PING, State: enabled, Index: 5, Scope Policy: 0, Sequence number: 1
Source vrf group: any
Destination vrf group: any
Source addresses: TrustNetwork
Destination addresses: UnrustNetwork
Applications: junos-icmp-all
Action: permit
Policy: ALL_DROP, State: enabled, Index: 8, Scope Policy: 0, Sequence number: 2
Source vrf group: any
Destination vrf group: any
Source addresses: any
Destination addresses: any
Applications: any
Action: deny
From zone: untrust, To zone: trust
Policy: ALL_DROP, State: enabled, Index: 7, Scope Policy: 0, Sequence number: 1
Source vrf group: any
Destination vrf group: any
Source addresses: any
Destination addresses: any
Applications: any
Action: deny
【ポリシー 検証】疎通試験
では、疎通試験をしてみましょう!
疎通試験① trustゾーン(192.168.10.1) → untrustゾーン(192.168.100.1)へのPing
まずは「clear security policies hit-countコマンド」にて、ポリシーカウンターをリセットしましょう!
test> clear security policies hit-count
test> show security policies hit-count
Logical system: root-logical-system
Index From zone To zone Name Policy count
1 trust trust trust-to-trust 0
2 trust untrust ALL_DROP 0
3 trust untrust PING 0
4 untrust trust ALL_DROP 0
では、クライアント端末(192.168.10.1)からuntrustゾーン(192.168.100.1)へPingを打ちましょう!
Test-macbook$ ping 192.168.100.1
PING 192.168.100.1 (192.168.100.1): 56 data bytes
64 bytes from 192.168.100.1: icmp_seq=0 ttl=127 time=3.947 ms
64 bytes from 192.168.100.1: icmp_seq=1 ttl=127 time=2.362 ms
64 bytes from 192.168.100.1: icmp_seq=2 ttl=127 time=2.480 ms
64 bytes from 192.168.100.1: icmp_seq=3 ttl=127 time=2.559 ms
64 bytes from 192.168.100.1: icmp_seq=4 ttl=127 time=2.518 ms
64 bytes from 192.168.100.1: icmp_seq=5 ttl=127 time=2.365 ms
64 bytes from 192.168.100.1: icmp_seq=6 ttl=127 time=2.557 ms
64 bytes from 192.168.100.1: icmp_seq=7 ttl=127 time=2.532 ms
64 bytes from 192.168.100.1: icmp_seq=8 ttl=127 time=2.217 ms
64 bytes from 192.168.100.1: icmp_seq=9 ttl=127 time=2.429 ms
^C
— 192.168.100.1 ping statistics —
10 packets transmitted, 10 packets received, 0.0% packet loss
round-trip min/avg/max/stddev = 2.217/2.597/3.947/0.462 ms
しっかり通信が出来ていることが分かりますね!
それではヒットカウントも確認したいと思います。
test> show security policies hit-count
Logical system: root-logical-system
Index From zone To zone Name Policy count
1 trust trust trust-to-trust 0
2 trust untrust ALL_DROP 0
3 trust untrust PING 10
4 untrust trust ALL_DROP 0
今回作成した許可ポリシー(PING)のカウンターがUPしていることを確認できますね!
最後に「show security flow sessionコマンド」でセッション情報も確認しておきましょう!
test> show security flow session
Session ID: 20918, Policy name: PING/5, Timeout: 2, Valid
In: 192.168.10.1/3 –> 192.168.100.1/11555;icmp, Conn Tag: 0x0, If: ge-0/0/1.0, Pkts: 1, Bytes: 84,
Out: 192.168.100.1/11555 –> 192.168.10.1/3;icmp, Conn Tag: 0x0, If: ge-0/0/2.0, Pkts: 1, Bytes: 84,
Total sessions: 1
疎通試験② untrustゾーン(192.168.100.1) → trustゾーン(192.168.10.1)へのPing
まずは「clear security policies hit-countコマンド」にて、ポリシーカウンターをリセットしましょう!
test> clear security policies hit-count
test> show security policies hit-count
Logical system: root-logical-system
Index From zone To zone Name Policy count
1 trust trust trust-to-trust 0
2 trust untrust ALL_DROP 0
3 trust untrust PING 0
4 untrust trust ALL_DROP 0
では、untrustゾーンのクライアント端末(192.168.100.1)からtrustゾーンのクライアント端末(192.168.10.1)へPingを打ちましょう!
Test-macbook$ ping 192.168.10.1
PING 192.168.10.1 (192.168.10.1): 56 data bytes
Request timeout for icmp_seq 0
Request timeout for icmp_seq 1
Request timeout for icmp_seq 2
Request timeout for icmp_seq 3
^C
— 192.168.10.1 ping statistics —
4 packets transmitted, 0 packets received, 100.0% packet loss
untrustゾーン発の通信の場合は、出来ない事が分かりますね!
それではヒットカウントも確認したいと思います。
test> show security policies hit-count
Logical system: root-logical-system
Index From zone To zone Name Policy count
1 trust trust trust-to-trust 0
2 trust untrust ALL_DROP 0
3 trust untrust PING 0
4 untrust trust ALL_DROP 4
Number of policy: 4
今回作成した許可ポリシー(ALL_DROP)のカウンターがUPしていることを確認できますね!
疎通試験③ untrustゾーン(192.168.100.1) → SRX(192.168.109.254)へのPing
untrustゾーンのクライアント端末(192.168.100.1)からSRX(192.168.109.254)へPingを打ちましょう!
Test-macbook$ ping 192.168.100.254
PING 192.168.100.254 (192.168.100.254): 56 data bytes
64 bytes from 192.168.100.254: icmp_seq=0 ttl=64 time=2.228 ms
64 bytes from 192.168.100.254: icmp_seq=1 ttl=64 time=1.769 ms
64 bytes from 192.168.100.254: icmp_seq=2 ttl=64 time=1.758 ms
64 bytes from 192.168.100.254: icmp_seq=3 ttl=64 time=1.233 ms
^C
— 192.168.100.254 ping statistics —
4 packets transmitted, 4 packets received, 0.0% packet loss
round-trip min/avg/max/stddev = 1.233/1.747/2.228/0.352 ms
今回は「host-inbound-traffic system-services pingオプション」を有効化しているので、Pingが通る事が分かりますね!
Junosの勉強方法

では最後にJunosの勉強方法について紹介いたします。
Juniper機器は通信プロバイダーなどのミッションクリティカルが環境で多く導入されております。
その為、Junosを勉強すると、大規模なネットワークへ関わるチャンスが増えます!
Junosの勉強は以下の参考書で勉強を進めましょう!!
以下のアマゾンリンクから内容の詳細(価格/評価等)が確認出来ますので、ぜひ確認してみて下さいね!


まとめ

最後までお読み頂きましてありがとうございます。
Juniperに関する記事は以下にまとめております。
ご興味のある方は是非ご覧ください。
- ▼ オススメの記事 ▼