本記事ではSRXのChassis Cluster設定手順についてご紹介させて頂きます。
>>参考記事: 「CCIEが語る!ネットワークエンジニアにオススメな本・参考書!」
>>参考記事: 「[まとめ] Juniper/Junosの検証結果を記事にまとめました!」
目次[閉じる]
- 1【Chassis Cluster 検証】検証内容
- 2【Chassis Cluster 検証】設定作業
- 3【Chassis Cluster 検証】正常性確認
- 4Junosの勉強方法
- 5まとめ
【Chassis Cluster 検証】検証内容

まず最初に検証内容の以下にまとめました。
ネットワーク図
検証時のネットワーク環境は以下の通りです。
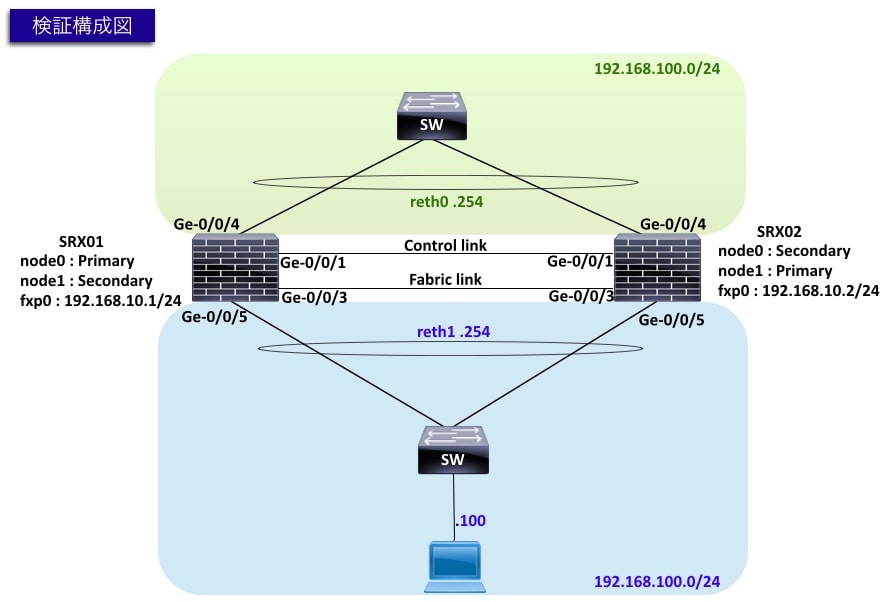
設定要件
以下の要件に基づきChassis Clusterの設定を実施します。
- SRX01とSRX02でChassis Clusterを組む事
- Reth1がtrust、Reth0がuntrustとして定義する事
- node0はPrimary:SRX01、Secondary:SRX02として設定する事
- node1はPrimary:SRX02、Secondary:SRX01として設定する事
【Chassis Cluster 検証】設定作業

それでは、Chassis Clusterの設定を進めてみましょう!
Chassis Clusterは以下の順序で設定することが可能です。
- 設定削除&初期設定
- Chassis Cluster有効化
- ホスト名・管理IPの設定
- Fabricリンクの設定
- Redundancyグループの設定
- Redundancyインターフェースの割り当て
- 冗長インタフェースの設定
- Interface モニタリングの設定
- セキュリティゾーンのの割り当て
それでは具体的な検証結果を交えて、紹介します!
手順1 : 設定削除&初期設定
まずはSRX-01,SRX-02の設定を「deleteコマンド」にて初期化します。
※Chassis Clusterは設定が残っていると、上手く組めないケースがあります。
// SRX01の設定
root# delete
This will delete the entire configuration
Delete everything under this level? [yes,no] (no) yes

// SRX02の設定
root# delete
This will delete the entire configuration
Delete everything under this level? [yes,no] (no) yes
その後、「set system root-authentication plain-text-passwordコマンド」にてRootパスワードを設定してcommitしましょう!
※パスワードは任意の文字で登録して下さい。
// SRX01の設定
root# set system root-authentication plain-text-password

// SRX02の設定
root# set system root-authentication plain-text-password
手順2 : Chassis Cluster有効化
次にChassis Cluster有効化設定を実施してみましょう!
「set chassis cluster cluster-idコマンド」にて有効化できます。
// SRX-01の設定
root> set chassis cluster cluster-id 1 node 0 reboot
Successfully enabled chassis cluster. Going to reboot now.

// SRX-02の設定
root> set chassis cluster cluster-id 1 node 1 reboot
Successfully enabled chassis cluster. Going to reboot now.
上記コマンドを入力すると、自動で再起動します。
再起動中に双方のSRXでchassis cluster関連の制御通信が実施され、双方の機器を認識し合います。
SRX01,SRX-2の設定は出来るだけ同時に設定するようにしましょう。
時間を空けすぎると上手く認識出来なくなる可能性があるので、気をつけましょう!
再起動が完了したら、正常にChassis Clusterが組まれているか以下の3点を確認しましょう。
Chassis Cluster 確認ポイント①
SRXのHAランプが緑色「点灯」になっているか、確認しましょう。
Chassis Cluster 確認ポイント②
各機器へコンソールアクセスして、node0側の出力が「primary:node0」、node1側の出力が「secondary:node1」になる事を確認しましょう。
出力イメージは以下の通りです。
// SRX-01(node0)の設定
root>

{primary:node0}

// SRX-02(node1)の設定
root>

{secondary:node1}
Chassis Cluster 確認ポイント③
「show chassis cluster status」にてnode0(primary)、node1(secondary)として認識していること、Monitor-failuresが「None」になっている事を確認しましょう!
// SRX-01(node0)の結果
root> show chassis cluster status
Monitor Failure codes:
    CS  Cold Sync monitoring        FL  Fabric Connection monitoring
    GR  GRES monitoring             HW  Hardware monitoring
    IF  Interface monitoring        IP  IP monitoring
    LB  Loopback monitoring         MB  Mbuf monitoring
    NH  Nexthop monitoring          NP  NPC monitoring
    SP  SPU monitoring              SM  Schedule monitoring
    CF  Config Sync monitoring      RE  Relinquish monitoring
    IS  IRQ storm

Cluster ID: 1
Node   Priority Status               Preempt Manual   Monitor-failures

Redundancy group: 0 , Failover count: 1
node0  1        primary              no      no       None
node1  1        secondary            no      no       None
手順3 : ホスト名・管理IPの設定
次にホスト名・管理IPの設定の実施してみましょう!
まずは「set groups nodeX system host-nameコマンド」にてホスト名の設定し、「set groups nodeX interfaces fxp0 unit 0 〜コマンド」にて管理IPを設定します。
※これからはSRX01(Node0)で設定してきます。
では、node0のホスト名を「SRX01」管理IPを「192.168.10.1」、node1のホスト名を「SRX02」管理IPを「192.168.10.2」として設定しましょう。
// SRX-01(node0)の設定
root# set groups node0 system host-name SRX01
root# set groups node0 interfaces fxp0 unit 0 family inet address 192.168.10.1/24
root# set groups node1 system host-name SRX02
root# set groups node1 interfaces fxp0 unit 0 family inet address 192.168.10.2/24
root# set apply-groups "${node}"
参考までに、このタイミングでcommitしてみます。
そうすると以下の通りホスト名が反映される事が分かると思います!
// SRX-01(node0)の結果
root# commit
node0:
configuration check succeeds
node1:
commit complete
node0:
commit complete

{primary:node0}[edit]
root@SRX01#
手順4 : Fabricリンクの設定
次にFabricリンクの設定を実施してみましょう!
Fabricリンクはセッション情報を同期する為に利用されるリンクです。
※Fabricリンクは任意のポートで設定可能です。
Fabricリンクは「set interfaces fabX fabric-options member-interfacesコマンド」にて設定可能です。
// SRX-01(node0)の設定
root@SRX01# set interfaces fab0 fabric-options member-interfaces ge-0/0/3
root@SRX01# set interfaces fab1 fabric-options member-interfaces ge-3/0/3
手順5 : Redundancyグループの設定
次にRedundancyグループの設定を実施してみましょう!
「set chassis cluster redundancy-group X node X priorityコマンド」にて設定可能です。
今回はnode0のPrimaryがSRX01、SecondaryはSRX02、そしてnode1のPrimaryはSRX02、SecondaryはSRX01として設定します。
Primary値が高い方が優先されますので、Primaryにしたい方を200に設定しましょう。
// SRX-01(node0)の設定
root@SRX01# set chassis cluster reth-count 2
root@SRX01# set chassis cluster redundancy-group 0 node 0 priority 200
root@SRX01# set chassis cluster redundancy-group 0 node 1 priority 1
root@SRX01# set chassis cluster redundancy-group 1 node 0 priority 200
root@SRX01# set chassis cluster redundancy-group 1 node 1 priority 1
手順6 : redundancyインターフェースの割り当て
次にredundancyインターフェースの割り当てを実施してみましょう!
「set interfaces ge-0/0/x gigether-options redundant-parentコマンド」にて設定可能です。
今回の構成ではSRX01のReth0は「ge-0/0/4」、Reth1は「ge-0/0/5」、SRX02はReth1は「ge-0/0/4(ge-3/0/4)」、Reth1は「ge-0/0/5(ge-3/0/5)」で設定します。
// SRX-01(node0)の設定
root@SRX01# set interfaces ge-0/0/4 gigether-options redundant-parent reth0
root@SRX01# set interfaces ge-0/0/5 gigether-options redundant-parent reth1
root@SRX01# set interfaces ge-3/0/4 gigether-options redundant-parent reth0
root@SRX01# set interfaces ge-3/0/5 gigether-options redundant-parent reth1
手順7 : 冗長インタフェースの設定
次に冗長インタフェースの設定を実施してみましょう!
「set interfaces rethX redundant-ether-options redundancy-group Xコマンド」にて設定可能です。
今回の構成ではReth0を「192.168.200.254」、Reth1を「192.168.100.254」で設定しましょう。
// SRX-01(node0)の設定
root@SRX01# set interfaces reth0 redundant-ether-options redundancy-group 1
root@SRX01# set interfaces reth0 unit 0 family inet address 192.168.200.254/24
root@SRX01# set interfaces reth1 redundant-ether-options redundancy-group 1
root@SRX01# set interfaces reth1 unit 0 family inet address 192.168.100.254/24
手順8 : Interface モニタリングの設定
次にInterface モニタリングの設定を実施してみましょう!
「set chassis cluster redundancy-group X interface-monitor ge-0/0/x weightコマンド」にて設定可能です。
また、リンク復旧時に元のリンクへ自動で切り戻したい場合は「preemptオプション」を有効にしましょう。
// SRX-01(node0)の設定
root@SRX01# set chassis cluster redundancy-group 1 preempt
root@SRX01# set chassis cluster redundancy-group 1 interface-monitor ge-0/0/4 weight 255
root@SRX01# set chassis cluster redundancy-group 1 interface-monitor ge-0/0/5 weight 255
root@SRX01# set chassis cluster redundancy-group 1 interface-monitor ge-3/0/4 weight 255
root@SRX01# set chassis cluster redundancy-group 1 interface-monitor ge-3/0/5 weight 255
手順9 : セキュリティゾーンのの割り当て
最後にセキュリティゾーンのの割り当てを実施してみましょう!
今回の構成ではReth1がtrust、Reth0がuntrustとして定義する事します。
※セキュリティ設定は実際の要件に応じて変更して下さいね。
// SRX-01(node0)の設定
root@SRX01# set security zones security-zone trust host-inbound-traffic system-services all
root@SRX01# set security zones security-zone trust host-inbound-traffic protocols all
root@SRX01# set security zones security-zone trust interfaces reth1.0

root@SRX01# set security zones security-zone untrust host-inbound-traffic system-services all
root@SRX01# set security zones security-zone untrust host-inbound-traffic protocols all
root@SRX01# set security zones security-zone untrust interfaces reth0.0
これでChassis Clusterの設定は完了です。
最後にcommitしましょう!
// SRX-01(node0)の設定
root@SRX01> commit
node0:
configuration check succeeds node1:
commit complete
node0:
commit complete
【Chassis Cluster 検証】正常性確認

では、Chassis Clusterの正常確認してみましょう!
Chassis Cluster 正常性確認
まずは「show chassis cluster status」「show chassis cluster interfaces」コマンドでChassis Clusterのステータスを確認してみましょう!
確認1 : show chassis cluster statusの確認結果
Monitor-failures欄が「none」になっている事を確認しましょう!
そして、node0のPrimaryがSRX01、SecondaryがSRX02、node1のPrimaryがSRX02、SecondaryがSRX01として認識していることを確認して下さい。
// SRX-01(node0)の結果
root@SRX01> show chassis cluster status
Monitor Failure codes:
    CS  Cold Sync monitoring        FL  Fabric Connection monitoring
    GR  GRES monitoring             HW  Hardware monitoring
    IF  Interface monitoring        IP  IP monitoring
    LB  Loopback monitoring         MB  Mbuf monitoring
    NH  Nexthop monitoring          NP  NPC monitoring
    SP  SPU monitoring              SM  Schedule monitoring
    CF  Config Sync monitoring      RE  Relinquish monitoring
    IS  IRQ storm

Cluster ID: 1
Node   Priority Status               Preempt Manual   Monitor-failures

Redundancy group: 0 , Failover count: 1
node0  200      primary              no      no       None
node1  1        secondary            no      no       None

Redundancy group: 1 , Failover count: 1
node0  200      primary              yes     no       None
node1  1        secondary            yes     no       None
確認2 : show chassis cluster interfacesの確認結果
インターフェースのステータスを確認しましょう。
fxp1, fab0, fab1, reth0, reth1, ge-0/0/4-5, ge-3/0/4-5がUPになっている事を確認しましょう。
// SRX-01(node0)の結果
root@SRX01> show chassis cluster interfaces
Control link status: Up

Control interfaces:
    Index   Interface   Monitored-Status   Internal-SA   Security
    0       fxp1        Up                 Disabled      Disabled

Fabric link status: Up

Fabric interfaces:
    Name    Child-interface    Status                    Security
                               (Physical/Monitored)
    fab0    ge-0/0/3           Up   / Up                 Disabled
    fab0
    fab1    ge-3/0/3           Up   / Up                 Disabled
    fab1

Redundant-ethernet Information:
    Name         Status      Redundancy-group
    reth0        Up          1
    reth1        Up          1

Redundant-pseudo-interface Information:
    Name         Status      Redundancy-group
    lo0          Up          0

Interface Monitoring:
    Interface         Weight    Status                    Redundancy-group
                                (Physical/Monitored)
    ge-3/0/5          255       Up  /  Up                 1
    ge-3/0/4          255       Up  /  Up                 1
    ge-0/0/5          255       Up  /  Up                 1
    ge-0/0/4          255       Up  /  Up                 1
以下の記事ではChassis Clusterの解除に関する記事を纏めております。
ご興味がある方はご覧ください!
>>参考記事: 「SRX Chassis Cluster の解除方法を紹介!」
>>参考記事: 「SRX Chassis Cluster の障害時の動作・切り替わりを紹介」
Junosの勉強方法

では最後にJunosの勉強方法について紹介いたします。
Juniper機器は通信プロバイダーなどのミッションクリティカルが環境で多く導入されております。
その為、Junosを勉強すると、大規模なネットワークへ関わるチャンスが増えます!
Junosの勉強は以下の参考書で勉強を進めましょう!!
以下のアマゾンリンクから内容の詳細(価格/評価等)が確認出来ますので、ぜひ確認してみて下さいね!


まとめ

最後までお読み頂きましてありがとうございます。
Juniperに関する記事は以下にまとめております。
ご興味のある方は是非ご覧ください。
>>参考記事: 「[まとめ] Juniper/Junosの検証結果を記事にまとめました!」
>>参考記事: 「業務で役立つshow、clear、requestコマンドを紹介!」