本記事ではOSPFの有効化設定(networkコマンドでの有効化)についてご紹介させて頂きます。[br num=”1″]
[br num=”1″]
>>参考記事: 「CCIEが語る!ネットワークエンジニアにオススメな本・参考書!」
>>参考記事: 「[まとめ] OSPF 基礎〜応用・検証結果の記事をまとめました!」
検証内容
設定要件及び検証ネットワークは以下の通りです。
設定要件
以下の要件に基づきOSPFの設定を実装する。
- R1・R2でOSPF(プロセスID 1)を有効化させる事
- Router-idは明示的に設定する事
- R1のLo1及びE0/3をバックボーンエリア(エリア0)に所属させる事
- R2のLo1及びE0/3をバックボーンエリア(エリア0)に所属させる事
- OSPFの有効化は「router ospfコマンド」配下で実装する事
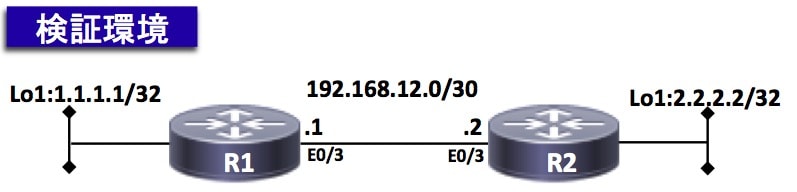
ネットワーク図
検証時のネットワーク環境は以下の通りです。
事前確認
検証前時点の各機器の設定内容やログは以下の通りです。
【事前確認】R1設定確認
以下の通り、IPアドレスは設定済です。
R1#show ip interface brief | exclude down
Interface                  IP-Address      OK? Method Status                Protocol
Ethernet0/3                192.168.12.1    YES manual up                    up
Loopback1                  1.1.1.1         YES manual up                    up
【事前確認】R2設定確認
以下の通り、IPアドレスは設定済です。
R2#show ip interface brief | exclude down
Interface                  IP-Address      OK? Method Status                Protocol
Ethernet0/3                192.168.12.2    YES manual up                    up
Loopback1                  2.2.2.2         YES manual up                    up
設定変更作業
では、以下にてOSPFの設定を実装していきます。
- R1にてOSPFの有効化/Router-idの設定を実装する
- R2にてOSPFの有効化/Router-idの設定を実装する
R1(config)# router ospf 1 // <--- プロセス番号「1」を設定
R1(config-router)# router-id 1.1.1.1 // <--- Router-idは明示的に設定(Lo0のIPアドレスを利用)
R1(config-router)# network 1.1.1.1 0.0.0.0 area 0 // <--- OSPF有効化(Lo0)
R1(config-router)# network 192.168.12.0 0.0.0.255 area 0 // <--- OSPF有効化(E0/3)
R2(config)# router ospf 1 // <--- プロセス番号「1」を設定
R2(config-router)# router-id 2.2.2.2 // <--- Router-idは明示的に設定(Lo0のIPアドレスを利用)
R2(config-router)# network 2.2.2.2 0.0.0.0 area 0 // <--- OSPF有効化(Lo0)
R2(config-router)# network 192.168.12.0 0.0.0.255 area 0 // <--- OSPF有効化(E0/3)
正常性確認
要件通り設定変更がされているか確認します。
【正常性確認①】OSPFの有効化確認
・R1のLo0・E0/3にてOSPFが有効化されている事を確認する。
R1#show ip ospf interface brief
Interface    PID   Area            IP Address/Mask    Cost  State Nbrs F/C
Lo1          1     0               1.1.1.1/32         1     LOOP  0/0 // <--- Lo1がOSPF1(エリア0)に所属している
Et0/3        1     0               192.168.12.1/24    10    BDR   1/1 // <--- E0/3がOSPF1(エリア0)に所属している
・R2のLo0・E0/3にてOSPFが有効化されている事を確認する。
R2#show ip ospf interface brief
Interface    PID   Area            IP Address/Mask    Cost  State Nbrs F/C
Lo1          1     0               2.2.2.2/32         1     LOOP  0/0 // <--- Lo1がOSPF1(エリア0)に所属している
Et0/3        1     0               192.168.12.2/24    10    DR    1/1 // <--- E0/3がOSPF1(エリア0)に所属している
【正常性確認②】OSPFネイバーテーブルを確認
・R1にてR2とネイバー確立が出来ている事を確認する。
R1#show ip ospf neighbor

Neighbor ID     Pri   State           Dead Time   Address         Interface
2.2.2.2           1   FULL/DR         00:00:36    192.168.12.2    Ethernet0/3 // <---R2(2.2.2.2)とネイバー確立されている
・R2にてR1とネイバー確立が出来ている事を確認する。
R2#show ip ospf neighbor

Neighbor ID     Pri   State           Dead Time   Address         Interface
1.1.1.1           1   FULL/BDR        00:00:33    192.168.12.1    Ethernet0/3 // <---R1(1.1.1.1)とネイバー確立されている
【正常性確認③】ルーティングテーブルを確認
・R1のルーティングテーブルにR2のLo1(2.2.2.2)経路がインストールされている事を確認する。
R1#show ip route ospf | begin Gateway
Gateway of last resort is not set

      2.0.0.0/32 is subnetted, 1 subnets
O        2.2.2.2 [110/11] via 192.168.12.2, 00:04:08, Ethernet0/3 // <---R2(2.2.2.2)がOSPFで学習されている
・R2のルーティングテーブルにR1のLo1(1.1.1.1)経路がインストールされている事を確認する。
R2#show ip route ospf | begin Gateway
Gateway of last resort is 0.0.0.0 to network 0.0.0.0

      1.0.0.0/32 is subnetted, 1 subnets
O        1.1.1.1 [110/11] via 192.168.12.1, 00:04:48, Ethernet0/3 // <---R1(1.1.1.1)がOSPFで学習されている
【正常性確認④】疎通確認
・R1からR2のLo1(2.2.2.2)へ通信出来る事を確認する。
R1#ping 2.2.2.2
Type escape sequence to abort.
Sending 5, 100-byte ICMP Echos to 2.2.2.2, timeout is 2 seconds:
!!!!!
Success rate is 100 percent (5/5), round-trip min/avg/max = 1/1/1 ms


R1#traceroute 2.2.2.2
Type escape sequence to abort.
Tracing the route to 2.2.2.2
VRF info: (vrf in name/id, vrf out name/id)
  1 192.168.12.2 2 msec 2 msec *
・R2からR1のLo1(1.1.1.1)へ通信出来る事を確認する。
R2#ping 1.1.1.1
Type escape sequence to abort.
Sending 5, 100-byte ICMP Echos to 1.1.1.1, timeout is 2 seconds:
!!!!!
Success rate is 100 percent (5/5), round-trip min/avg/max = 1/1/1 ms


R2#traceroute 1.1.1.1
Type escape sequence to abort.
Tracing the route to 1.1.1.1
VRF info: (vrf in name/id, vrf out name/id)
  1 192.168.12.1 4 msec 1 msec *
まとめ
いかがでしたでしょうか?[br num="1"]
OSPFの有効化設定については理解しておきましょう!
Router(config)# router ospf [プロセス番号]
Router(config-router)# router-id [ルータID番号]
Router(config-router)# network [ネットワークアドレス] [ワイルドマスク] area [エリア番号]
[br num="1"]
網羅的にOSPFの知識を身につけたい方は、以下のまとめ記事をご確認ください!!
[br num="1"]
>>参考記事: 「[まとめ] OSPF 基礎〜応用・検証結果の記事をまとめました!」