本記事ではSRXのSource NAT設定及び正常性確認の検証結果をご紹介させて頂きます。
>>参考記事: 「CCIEが語る!ネットワークエンジニアにオススメな本・参考書!」
>>参考記事: 「[まとめ] Juniper/Junosの検証結果を記事にまとめました!」
【Source NAT 検証】検証内容

まず最初に検証内容の以下にまとめました。
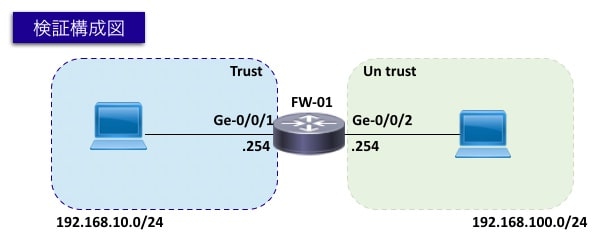
ネットワーク図
検証時のネットワーク環境は以下の通りです。

設定要件
以下の要件に基づきSource NATの設定を実施します。
- Trustゾーンの送信元IPアドレス(192.168.10.0/24)からUntrustゾーンへ通信する際、アドレスを変換する
- 変換するIPアドレスレンジは192.168.100.100〜192.168.100.199とする
【Source NAT 検証】設定作業

それでは、Source NATの設定を進めてみましょう!
検証の前提として基本設定(IPアドレスやゾーン、ポリシー設定など)は既に完了しております。
ポリシーの設定に関する記事は以下の記事に纏めておりますので、ご興味のある方はご覧下さい!
>>参考記事: 「SRX ポリシー(ACL)、アドレスブックの設定方法・showコマンドを紹介」
それでは本題のSource NATの検証を開始していきましょう!
Source NATの設定は以下の順序で設定することが可能です。
- 変換するアドレスプールの設定
- 変換元・変換先のセキュリティゾーンを指定
- 変換元アドレス・アドレスプールの紐付け
- Proxy-ARPの設定
それでは1つずつ解説していきます!
手順1 : 変換するアドレスプールの設定
アドレスプールの設定は「set security nat source pool コマンド」にて設定可能です。
本コマンドにて変換するIPアドレスレンジを指定します。
今回はアドレスレンジ(192.168.100.100〜192.168.100.199)を設定します。
1 2 | // アドレスプールの設定 set security nat source pool NAT-POOL address 192.168.100.100/32 to 192.168.100.199/32 |
手順2 : 変換元・変換先のセキュリティゾーンを指定
Address-bookの設定は「set security nat source rule-setコマンド」にて設定可能です。
「from zoneオプション」にて変換元のセキュリティゾーン、「to zoneオプション」にて変換先のセキュリティゾーンを指定することが出来ます。
今回は変換元ゾーンをtrustゾーン、変換先ゾーンをuntrustゾーンとして設定します。
1 2 3 | // ゾーン設定 set security nat source rule-set SOURCE-NAPT from zone trust set security nat source rule-set SOURCE-NAPT to zone untrust |
手順3 : 変換元アドレス・アドレスプールの紐付け
変換元アドレス・アドレスプールの紐付けの設定は「set security nat source rule-setコマンド」にて設定可能です。
「match source-addressオプション」にて送信元IPアドレスを定義し、「then source-natオプション」にて手順1で作成したアドレスプールを指定します。
1 2 3 | // Trustゾーンの送信元IPアドレス(192.168.10.0/24)からUntrustゾーンへ通信する際、NAT-POOLのIPアドレスへ変換する set security nat source rule-set SOURCE-NAPT rule NAPT match source-address 192.168.10.0/24 set security nat source rule-set SOURCE-NAPT rule NAPT then source-nat pool NAT-POOL |
手順4 : Proxy-ARPの設定
最後にProxy-ARPの設定です。
この設定を忘れると上手くアドレス変換がされないので、忘れないようにしましょう!
1 2 | // unrustゾーンのインターフェースge-0/0/2に対してProxy-ARPを設定 set security nat proxy-arp interface ge-0/0/2.0 address 192.168.100.100/32 to 192.168.100.199/32 |
ここまででSource NATの設定は完了です。
【Source NAT 検証】正常性確認

では、正常性確認してみましょう!
Source NAT 正常性確認
まずは「show security nat source summary 」コマンドでゾーン設定を確認してみましょう!
show security nat source summary の確認結果
実際のログは以下の通りです。
今回作成したアドレスプール(NAT-POOL)とNATルールセット(SOURCE-NAPT)が正しく設定されている事を確認しましょう!
1 2 3 4 5 6 7 8 9 10 11 | test> show security nat source summary Total port number usage for port translation pool: 6451200 Maximum port number for port translation pool: 67108864 Total pools: 1 Pool Address Routing PAT Total Name Range Instance Address NAT-POOL 192.168.100.100-192.168.100.199 default yes 100 Total rules: 1 Rule name Rule set From To Action NAPT SOURCE-NAPT trust untrust NAT-POOL |
【参考】show security nat source summary の確認結果
「show security nat source pool [アドレスプール]」にてアドレスプールに関する詳細情報を確認出来ます!
実際のログは以下の通りです。
1 2 3 4 5 6 7 8 9 10 11 12 13 14 | test> show security nat source pool NAT-POOL Pool name : NAT-POOL Pool id : 4 Routing instance : default Host address base : 0.0.0.0 Port : [1024, 63487] Twin port : [63488, 65535] Port overloading : 1 Address assignment : no-paired Total addresses : 100 Translation hits : 234 Address range Single Ports Twin Ports 192.168.100.100 - 192.168.100.199 4 0 Total used ports : 4 0 |
【Source NAT 検証】疎通試験

では、疎通試験をしてみましょう!
疎通試験 trustゾーン(192.168.10.1) → untrustゾーン(192.168.100.1)へのPing
では、クライアント端末(192.168.10.1)からuntrustゾーン(192.168.100.1)へPingを打ちましょう!
1 2 3 4 5 6 7 8 9 10 11 12 | Test-macbook$ ping 192.168.100.1 PING 192.168.100.1 (192.168.100.1): 56 data bytes 64 bytes from 192.168.100.1: icmp_seq=0 ttl=127 time=498.981 ms 64 bytes from 192.168.100.1: icmp_seq=1 ttl=127 time=498.293 ms 64 bytes from 192.168.100.1: icmp_seq=2 ttl=127 time=497.711 ms 64 bytes from 192.168.100.1: icmp_seq=3 ttl=127 time=494.147 ms 64 bytes from 192.168.100.1: icmp_seq=4 ttl=127 time=488.909 ms 64 bytes from 192.168.100.1: icmp_seq=5 ttl=127 time=488.247 ms ^C --- 192.168.100.1 ping statistics --- 6 packets transmitted, 6 packets received, 0.0% packet loss round-trip min/avg/max/stddev = 488.247/494.381/498.981/4.381 ms |
しっかり通信が出来ていることが分かりますね!
show security flow session の確認結果
それでは「show security flow sessionコマンド」セッションも確認したいと思います。
実際のログは以下の通りです。
1 2 3 4 5 6 7 8 9 10 11 12 | test> show security flow session Session ID: 21, Policy name: PING/5, Timeout: 2, Valid In: 192.168.10.1/2 --> 192.168.100.1/51491;icmp, Conn Tag: 0x0, If: ge-0/0/1.0, Pkts: 1, Bytes: 84, Out: 192.168.100.1/51491 --> 192.168.100.138/9323;icmp, Conn Tag: 0x0, If: ge-0/0/2.0, Pkts: 1, Bytes: 84, Session ID: 25, Policy name: PING/5, Timeout: 2, Valid In: 192.168.10.1/3 --> 192.168.100.1/51491;icmp, Conn Tag: 0x0, If: ge-0/0/1.0, Pkts: 1, Bytes: 84, Out: 192.168.100.1/51491 --> 192.168.100.139/4778;icmp, Conn Tag: 0x0, If: ge-0/0/2.0, Pkts: 1, Bytes: 84, Session ID: 28, Policy name: PING/5, Timeout: 4, Valid In: 192.168.10.1/4 --> 192.168.100.1/51491;icmp, Conn Tag: 0x0, If: ge-0/0/1.0, Pkts: 1, Bytes: 84, Out: 192.168.100.1/51491 --> 192.168.100.140/4390;icmp, Conn Tag: 0x0, If: ge-0/0/2.0, Pkts: 1, Bytes: 84, |
上記の通り、送信元192.168.10.1の通信が「192.168.100.140〜」へ変換されている事が分かりますね。
show security nat source rule の確認結果
それでは「show security nat source ruleコマンド」でヒット数を確認したいと思います。
「Translation hits」箇所を確認する事により、アドレス変換した回数を確認する事が可能です。
実際のログは以下の通りです。
1 2 3 4 5 6 7 8 9 10 11 12 13 14 15 16 17 | test> show security nat source rule NAPT source NAT rule: NAPT Rule-set: SOURCE-NAPT Rule-Id : 1 Rule position : 1 From zone : trust To zone : untrust Match Source addresses : 192.168.10.0 - 192.168.10.255 Action : NAT-POOL Persistent NAT type : N/A Persistent NAT mapping type : address-port-mapping Inactivity timeout : 0 Max session number : 0 Translation hits : 369 // アドレス変換数 Successful sessions : 369 // 成功した回数 Failed sessions : 0 // 失敗した回数 Number of sessions : 5 |
Junosの勉強方法

では最後にJunosの勉強方法について紹介いたします。
Juniper機器は通信プロバイダーなどのミッションクリティカルが環境で多く導入されております。
その為、Junosを勉強すると、大規模なネットワークへ関わるチャンスが増えます!
Junosの勉強は以下の参考書で勉強を進めましょう!!
以下のアマゾンリンクから内容の詳細(価格/評価等)が確認出来ますので、ぜひ確認してみて下さいね!
まとめ

最後までお読み頂きましてありがとうございます。
Juniperに関する記事は以下にまとめております。
ご興味のある方は是非ご覧ください。
>>参考記事: 「[まとめ] Juniper/Junosの検証結果を記事にまとめました!」
>>参考記事: 「業務で役立つshow、clear、requestコマンドを紹介!」


