
本記事ではHSRP認証の設定変更についてご紹介させて頂きます。[br num=”1″]
本記事はHSRPを理解されている前提の記事になっておりますので、HSRPに関して復習されたい人は以下の記事をご確認下さい。
[keni-linkcard url=”https://if-network.com/hrsp-basis/”]
検証前提
設定要件及び検証ネットワークは以下の通りです。
設定要件
以下の要件に基づきHSRPの設定を実装する。
- 管理外機器が誤接続されたとしても、HSRPグループ5に所属する事を防止する事(HSRP認証を有効化)
- HSRPの認証時に利用するパスワードは「HSRP5」を利用する事
- HSRPの認証情報は平文で送信される事
ネットワーク図
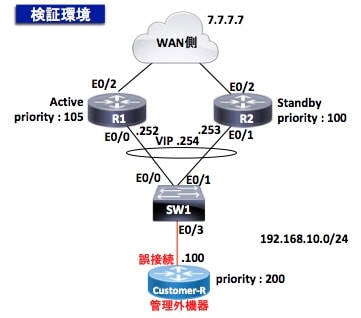
検証時のネットワーク環境は以下の通りです。
事前確認
検証前時点の各機器の設定内容やログは以下の通りです。
※HSRPに関連するconfigのみを抜粋しております。
R1設定確認
以下の通り、LAN側のIPアドレスとHSRPの基本設定(HSRPグループ,プライオリティ,プリエンプト)は設定済です。
R1#show running-config interface e0/0
Building configuration...
!
interface Ethernet0/0
 ip address 192.168.10.252 255.255.255.0
 standby 5 ip 192.168.10.254 //←HSRPの仮想IPアドレスは設定済
 standby 5 priority 105 //←HSRPのプライオリティ値は設定済
 standby 5 preempt //←HSRPのプリエンプトは設定済
end

R1#show standby brief
                     P indicates configured to preempt.
                     |
Interface   Grp  Pri P State   Active          Standby         Virtual IP
Et0/0       5    105 P Active  local           192.168.10.253  192.168.10.254

//↑↑↑ Grp(HSRPグループ)が5、P(プリエンプト)が有効化、StateがActive(アクティブルータ)を意味する

R1#show standby | inc MAC
  Active virtual MAC address is 0000.0c07.ac05
    Local virtual MAC address is 0000.0c07.ac05 (v1 default)  //← HSRPバージョン1が適用されている事を確認

R1#show standby | inc Hello
  Hello time 3 sec, hold time 10 sec
※補足:WAN側に関するルーティング設定は実装済みです。(configは省略しております)
R2設定確認
以下の通り、LAN側のIPアドレスとHSRPの基本設定(HSRPグループ)は設定済です。
R2#show running-config interface e0/1
Building configuration...

Current configuration : 99 bytes
!
interface Ethernet0/1
 ip address 192.168.10.253 255.255.255.0
 standby 5 ip 192.168.10.254 //←HSRPの仮想IPアドレスは設定済
end

R2#show standby brief
                     P indicates configured to preempt.
                     |
Interface   Grp  Pri P State   Active          Standby         Virtual IP
Et0/1       5    100   Standby 192.168.10.252  local           192.168.10.254

//↑↑↑Grp(HSRPグループ)が5、StateがStandby(スタンバイルータ)を意味する

R2#show standby | inc MAC
  Active virtual MAC address is 0000.0c07.ac05
    Local virtual MAC address is 0000.0c07.ac05 (v1 default)  //← HSRPバージョン1が適用されている事を確認
※補足:WAN側に関するルーティング設定は実装済みです。(configは省略しております)
SW1設定確認
以下の通り、SWのポートは全てVLAN1のAccessPortとして設定済です。
SW1#show interfaces status

Port      Name               Status       Vlan       Duplex  Speed Type
Et0/0                        connected    1            auto   auto unknown
Et0/1                        connected    1            auto   auto unknown
Et0/2                        connected    1            auto   auto unknown
Et0/3                        connected    1            auto   auto unknown
管理外機器(Customer-R)設定確認
以下の通り、LAN側のIPアドレスとHSRPの基本設定(HSRPグループ)は設定済です。
Customer-R# show running-config interface e0/3
Building configuration...

Current configuration : 142 bytes
!
interface Ethernet0/3
 ip address 192.168.10.100 255.255.255.0
 standby 5 ip 192.168.10.254
 standby 5 priority 200
 standby 5 preempt
end
【補足】HSRPの認証設定をしていない場合の不具合確認
HSRPの検証作業を実施する前に、HSRPの認証設定をせずに管理外機器(Customer-R)を接続した際の不具合事象を確認しましょう!

上記の図の通り、管理外機器(Customer-R)がアクティブルータへ昇格してしまい、WANへの到達性も失われてしまいます。
ログは以下の通りです。
//以下の通り、R1がActiveからStandby状態へ変わってしまう。
R1#sh standby brief
                     P indicates configured to preempt.
                     |
Interface   Grp  Pri P State   Active          Standby         Virtual IP
Et0/0       5    105 P Standby 192.168.10.100  local           192.168.10.254

//以下の通り、R2がStandbyからListen状態へ変わってしまう。
R2#sh standby brief
                     P indicates configured to preempt.
                     |
Interface   Grp  Pri P State   Active          Standby         Virtual IP
Et0/1       5    100   Listen  192.168.10.100  192.168.10.252  192.168.10.254

//以下の通り、管理外機器(Customer-R)がActive状態になってしまう。
Customer-R#show standby brief
                     P indicates configured to preempt.
                     |
Interface   Grp  Pri P State   Active          Standby         Virtual IP
Et0/3       5    200 P Active  local           192.168.10.252  192.168.10.254
では、以下にてHSRPの認証設定を実施いたします。
設定変更作業
では、以下にてHSRPの設定を実装していきます。
- R1のHSRPの認証設定(パスワード:HSRP5)を実装する
- R2のHSRPの認証設定(パスワード:HSRP5)を実装する
R1(config)# interface e0/0
R1(config-if)# standby 5 authentication text HSRP5
R2(config)# interface e0/1
R2(config-if)# standby 5 authentication text HSRP5
正常性確認
要件通り設定変更がされているか確認します。
R1設定確認
・R1にてHSRPの認証設定が正常に動作している事を確認する。
R1#sh standby brief
                     P indicates configured to preempt.
                     |
Interface   Grp  Pri P State   Active          Standby         Virtual IP
Et0/0       5    105 P Active  local           192.168.10.253  192.168.10.254

//↑↑↑ HSRPのネイバー状態は変化ない事(Activeのままである事)

R1#show standby | inc Auth
  Authentication text, string "HSRP5"  //← HSRPの認証設定(パスワード:HSRP5)が有効化されている事を意味する
R2設定確認
・R2にてHSRPの認証設定が正常に動作している事を確認する。
R2#sh standby brief
                     P indicates configured to preempt.
                     |
Interface   Grp  Pri P State   Active          Standby         Virtual IP
Et0/1       5    100   Standby 192.168.10.252  local           192.168.10.254

//↑↑↑ HSRPのネイバー状態は変化ない事(Activeのままである事)

R2#show standby | inc Auth
  Authentication text, string "HSRP5"  //← HSRPの認証設定(パスワード:HSRP5)が有効化されている事を意味する
[box class=”box_style_blue” title=”管理外機器(Customer-R)を接続された際のログ”]
認証設定が有効化された状態で管理外機器(Customer-R)を接続された際、以下のエラーログが出力されます。
*Nov 19 09:50:02.267: %HSRP-4-BADAUTH: Bad authentication from 192.168.10.100, group 5, remote state Active
*Nov 19 09:50:34.381: %HSRP-4-BADAUTH: Bad authentication from 192.168.10.100, group 5, remote state Active

//↑↑↑ 上記の通り、認証エラーログがR1/R2に出力され、管理外機器(Customer-R)がHSRPグループ5のアクティブルータになる事を防止可能です。
[/box]
まとめ
いかがでしたでしょうか?[br num=”1″]
HSRPの認証の設定変更方法については理解しておきましょう!
Router(config)# interface [インターフェース名&番号]
Router(config-if)# standby [HSRPグループ番号] authentication text [パスワード]