
本記事では「OSPFのtimers throttle spfタイマー」の設定及び正常性確認に関する検証結果をご紹介させて頂きます。
[br num=”1″]
>>参考記事: 「CCIEが語る!ネットワークエンジニアにオススメな本・参考書!」
>>参考記事: 「[まとめ] OSPF 基礎〜応用・検証結果の記事をまとめました!」
【timers throttle spf 検証】検証内容
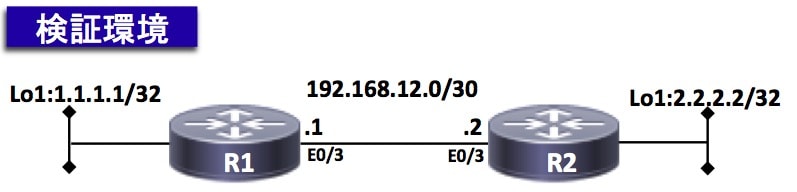
設定要件及び検証ネットワークは以下の通りです。
ネットワーク図
検証時のネットワーク環境は以下の通りです。
設定要件
以下の要件に基づきOSPFの設定を実装する。
- sfp start-intervalを1000ミリ秒にする事
- sfp hold-intervalを2000ミリ秒にする事
- sfp max wait-intervalを4000ミリ秒にする事
【timers throttle spf 検証】事前確認 ※興味ない方は飛ばしてOKです。
本検証ネットワークのOSPFステータスを以下に纏めております。
興味のない方は「4章:設定変更作業から」をクリックして下さい。
検証前時点の各機器の設定内容やログは以下の通りです。
・「show ip ospf interface brief」コマンドで各OSPFインターフェース情報を出力しております。
R1#show ip ospf interface brief
Interface    PID   Area            IP Address/Mask    Cost  State Nbrs F/C
Lo0          1     0               1.1.1.1/24         1     LOOP  0/0
Et0/3        1     0               192.168.12.1/30    10    BDR   1/1

R2#show ip ospf interface brief
Interface    PID   Area            IP Address/Mask    Cost  State Nbrs F/C
Lo0          1     0               2.2.2.2/24         1     LOOP  0/0
Et0/3        1     0               192.168.12.2/30    10    DR    1/1
・「show ip ospf neighbor」コマンドでネイバー状態を出力しております。
以下の通り、全ルータ間でOSPFネイバーが確立出来ている事が確認できると思います。
R1#show ip ospf neighbor

Neighbor ID     Pri   State           Dead Time   Address         Interface
2.2.2.2           1   FULL/DR         00:00:35    192.168.12.2    Ethernet0/3

R2#show ip ospf neighbor

Neighbor ID     Pri   State           Dead Time   Address         Interface
1.1.1.1           1   FULL/BDR        00:00:34    192.168.12.1    Ethernet0/3
・R1とR2の「show ip route ospf」コマンドでルーティングテーブルを出力しております。
以下の通り、双方のOSPF経路を受信出来ている事が確認できると思います。
▼ R1のルーティングテーブル▼
R1#show ip route ospf | begin Gateway
Gateway of last resort is not set

      2.0.0.0/32 is subnetted, 1 subnets
O        2.2.2.2 [110/11] via 192.168.12.2, 00:10:22, Ethernet0/3
▼ R2のルーティングテーブル▼
R2#show ip route ospf | begin Gateway
Gateway of last resort is 0.0.0.0 to network 0.0.0.0

      1.0.0.0/32 is subnetted, 1 subnets
O        1.1.1.1 [110/11] via 192.168.12.1, 00:10:20, Ethernet0/3
・R1とR2の「show run all | include throttle spf」「show ip ospf | include SPF」コマンドでOSPFのタイマー値を出力しております。
以下の通り、デフォルト値はstart-intervalが「5000ミリ秒」、hold-intervalが「10000ミリ秒」、max-intervalが「10000ミリ秒」である事が確認できると思います。
▼ R1のthrottle spfタイマー値 ▼
R1#show run all | include throttle spf
 timers throttle spf 5000 10000 10000


R1#show ip ospf | include SPF
 Initial SPF schedule delay 5000 msecs
 Minimum hold time between two consecutive SPFs 10000 msecs
 Maximum wait time between two consecutive SPFs 10000 msecs
▼ R2のthrottle spfタイマー値 ▼
R2#show run all | include throttle spf
 timers throttle spf 5000 10000 10000


R2#show ip ospf | include SPF
 Initial SPF schedule delay 5000 msecs
 Minimum hold time between two consecutive SPFs 10000 msecs
 Maximum wait time between two consecutive SPFs 10000 msecs
では、具体的にどのように変わるかを確認していきましょう!
【timers throttle spf 検証】設定変更作業
では、以下にてthrottle spfの各種タイマー値を変更してみます。
[br num=”1″]
以下にて、デフォルト値はstart-intervalが「1000ミリ秒」、hold-intervalが「2000ミリ秒」、max-intervalが「4000ミリ秒」に変更します。
- R1にてthrottle spfタイマーを変更する
- R2にてthrottle spfタイマーを変更する
R1(config)#router ospf 1
R1(config-router)#timers throttle spf 1000 2000 4000
R2(config)#router ospf 1
R2(config-router)#timers throttle spf 1000 2000 4000
【timers throttle spf 検証】正常性確認
では、timers throttle spfの変更結果を確認してみましょう!
まずは設定前のthrottle spfタイマー値を「show run all | include throttle spf」「show ip ospf | include SPF」コマンドで確認します。
以下の通り、設定前はデフォルト値であるstart-intervalが「5000ミリ秒」、hold-intervalが「10000ミリ秒」、max-intervalが「10000ミリ秒」である事が確認できると思います。
▼ R1のthrottle spfタイマー値 ▼
R1#show run all | include throttle spf
 timers throttle spf 5000 10000 10000


R1#show ip ospf | include SPF
 Initial SPF schedule delay 5000 msecs
 Minimum hold time between two consecutive SPFs 10000 msecs
 Maximum wait time between two consecutive SPFs 10000 msecs
▼ R2のthrottle spfタイマー値 ▼
R2#show run all | include throttle spf
 timers throttle spf 5000 10000 10000


R2#show ip ospf | include SPF
 Initial SPF schedule delay 5000 msecs
 Minimum hold time between two consecutive SPFs 10000 msecs
 Maximum wait time between two consecutive SPFs 10000 msecs
[br num=”1″]
次に設定後のthrottle spfタイマー値を「show run all | include throttle spf」「show ip ospf | include SPF」コマンドで確認します。
以下の通り、設定後はstart-intervalが「1000ミリ秒」、hold-intervalが「2000ミリ秒」、max-intervalが「4000ミリ秒」に変更されている事が確認できると思います。
▼ R1のthrottle spfタイマー値 ▼
R1#show run all | include throttle spf
 timers throttle spf 1000 2000 4000


R1#show ip ospf | include SPF
 Initial SPF schedule delay 1000 msecs
 Minimum hold time between two consecutive SPFs 2000 msecs
 Maximum wait time between two consecutive SPFs 4000 msecs
▼ R2のthrottle spfタイマー値 ▼
R2#show run all | include throttle spf
 timers throttle spf 1000 2000 4000


R2#show ip ospf | include SPF
 Initial SPF schedule delay 1000 msecs
 Minimum hold time between two consecutive SPFs 2000 msecs
 Maximum wait time between two consecutive SPFs 4000 msecs
まとめ

最後までお読み頂きありがとうございました。
以下に他のOSPFの記事も纏めておりますので、ご興味のある方は是非ご覧ください。
[br num=”1″]
網羅的にOSPFの知識を身につけたい方は、以下のまとめ記事をご確認ください!!
>>参考記事: 「[まとめ] OSPF 基礎〜応用・検証結果の記事をまとめました!」